
Below is a full, practical guide on how to do that using a print-ready template like this 10-generation editable PDF chart on Etsy, which we will use as a concrete example.
You can follow the same steps with similar templates from FamilyTreeTemplates.org or any other genealogy chart you like.
Why turn your family tree into a keepsake?
A family tree template not only offers structure and clarity but also provides the flexibility to customize each field according to your specific family history. By using an editable PDF format, you gain the ability to modify key details without worrying about making mistakes or needing to start over. This means you can easily update or add new information as you discover more about your ancestry, whether that’s through family interviews or online genealogy research.
Research is usually scattered across:
- Online trees
- Handwritten notes
- Screenshots from archives
- Old photocopies
A keepsake chart pulls all of that into one clear visual:
- It shows the "big picture" of your ancestry at a glance
- It is easy to share with relatives who are not online
- It can become a framed piece on your wall or a special reunion gift
Instead of "my genealogy spreadsheet", you now have "our family tree", which feels very different when it is hanging in the living room.
Choose a print-friendly template
Let’s use the 10-generation Family Tree Chart from Etsy as our reference, because it has many of the features you want for a keepsake.
Key points from example product's description:
- 10 generations on one chart
- Editable PDF with form fields
- Fields for key facts like name, occupation, birth and death dates
- Different visual styles in one download:
- Colorful version with "Family Tree" title
- Colorful version without title
- Grey-tone versions (with and without title)
- Plain versions (with and without title)
- Editable fields marked in blue, so you know exactly where to type
- Boxes, lines, and layout are locked, so you cannot accidentally break the design
- Vector format so it can be printed big (like 36 x 48 inches) without losing quality
When you pick a template for a keepsake, look for:
Enough generations for your current research
A layout that will still be readable when printed large
A style that fits how you plan to display it (colorful, minimalist, vintage, etc.)
Clear, well-spaced fields so you are not forced to cram text in tiny boxes
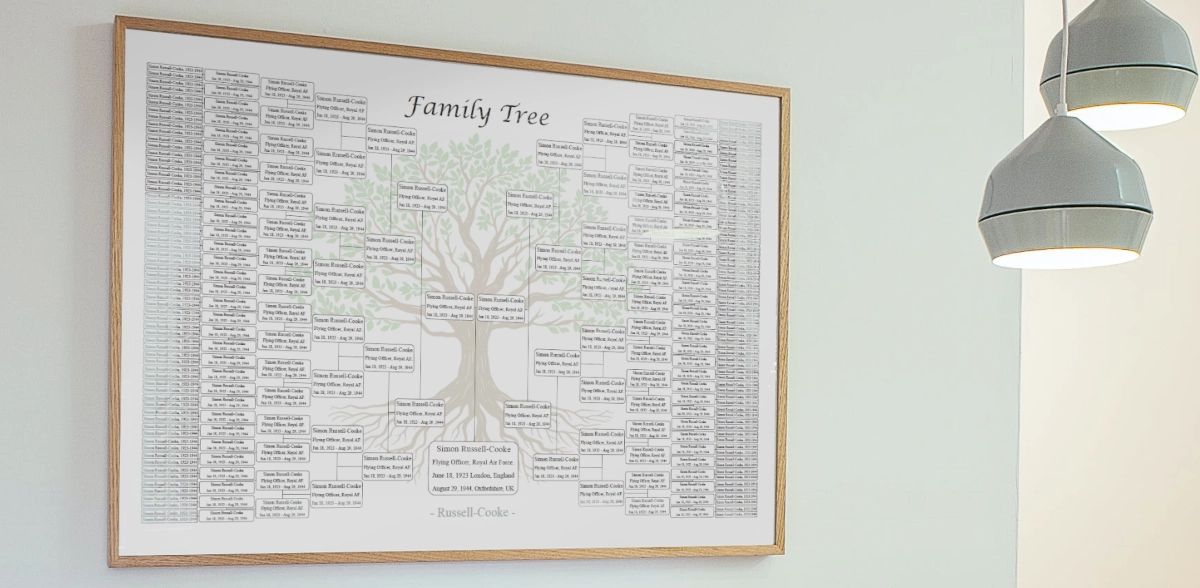
If you are planning a framed print for a wall, a 10-generation poster-style chart like this is a very good starting point.
Prepare your family data before you start typing
Before you open the PDF and start filling fields, get your information in order. This saves a lot of frustration later.
Create a simple working document (spreadsheet, Word, or even a sheet of paper). For each ancestor, list:
- Full name (decide on a format, like "First M. Last" or "LAST, First")
- Birth date (pick a consistent format, such as 12 Mar 1902)
- Death date
- Birthplace and death place (if you want to include places)
- Occupation or a short descriptor (farmer, teacher, tailor, "immigrated from Poland in 1912," etc.)
The Etsy template we are using as an example suggests name, occupation, and birth/death dates as the standard set.
You do not need every fact for every person. Use what you have. A clean, partly-complete chart looks better than a crowded, hard-to-read one.
Filling in an editable family tree template (step-by-step)
Step 1: Download and unzip
If you are using the Etsy chart:
- Purchase and download the ZIP file from your Etsy account.
- Find the ZIP file on your computer and extract it (usually by double-clicking it or choosing "Extract all").
- Inside, you will see 6 PDF files, one for each style variation:
- Colorful with "Family Tree" title
- Colorful without title
- Grey with title
- Grey without title
- Plain with title
- Plain without title
Pick the one that matches your vision. For a framed keepsake, many people prefer the colored or grey-tone version, as they look clean and work well in most rooms.
Step 2: Open in a PDF editor
The listing notes that the PDF is editable in programs like Adobe Acrobat Reader, including the free version. You can download free Adobe Reader here.
- Open Adobe Reader.
- Go to File → Open and choose your preferred PDF.
- You will see fields highlighted in blue. These are the editable form fields.
Remember:
- The boxes, lines, and layout are not editable, so you cannot move things around or change the structure.
- Only the blue fields accept text.
This protects the design and ensures your finished chart keeps its clean, professional look.
Step 3: Add your family name and header
Most of the versions include an editable family name header.
Click the header field and type something like:
- "The Johnsson Family"
- "Descendants of John Smith"
- "Our Family Tree"
Keep it short. The header should be readable from a distance when the poster is on a wall.
Step 4: Fill in the ancestor fields
Now fill in the generations:
- Start with the focus person (often yourself or a grandparent).
- Move outwards generation by generation.
- In each box, type the key facts you decided on earlier.
For a field that might be limited in space, a simple layout works well, for example:
- First line: Name
- Second line: Birth and death dates
- Third line: Occupation or short note
The template automatically adjusts font size based on how much you type. The product description warns that adding a lot of text to a small field may shrink the font.
So:
- Use short, consistent formats
- Avoid long sentences in small boxes
- Use standard abbreviations if needed (b. 1902, d. 1985, etc.)
Step 5: Save versions as you go
Do not wait until the end to save. Use a simple version naming system:
- draft1.pdf, draft2.pdf, draft3.pdf
- FamilyTree-10Gen-final-print.pdf
That way, if you change your mind about formatting, you can go back to an earlier version without retyping everything.
Choosing the right print size and paper
The Etsy template we are using as an example is designed to be printed at US Poster size 36 x 48 inches (Architectural E).
Because the file is vector-based, you can print at other sizes too, such as A2 or A3, without losing sharpness.
Here is how to decide:
- Large wall piece (main keepsake): Go with the recommended 36 x 48 in or equivalent. This allows 10 generations to remain readable.
- Smaller copy for a binder or gift: You can scale down to A3 or even A4, but accept that small text will be harder to read. These smaller prints work well as "take-home copies" for relatives.
For paper:
- Choose matte or satin over shiny gloss for most home interiors.
- Pick heavyweight paper or card stock if your print shop offers it. It will look more like a poster and less like a basic printout.
Where to print:
- Local print / copy shop ; such as VistaPrint
- Online poster printing service
- Office printer (if it supports large formats or if you are printing smaller sizes)
Always download or save the highest-quality PDF (which you already have from the template) and send that directly to the printer. Do not export it as a low-resolution image.
Archival printing and preservation choices
A family tree keepsake is different from a quick worksheet. The goal is not only to make the chart attractive, but also to preserve the research in a format that relatives can read, understand, and keep. This is why print size, paper choice, file quality, and backup copies matter.
Use a readable size before choosing the frame
Pick the print size based on the number of generations first, not the frame size. Deep ancestry charts need enough physical space for names, dates, and short notes to stay readable from normal viewing distance.
Keep one archival copy and one display copy
For genealogy preservation, it is useful to keep a clean digital PDF, a printed display version, and a separate backup copy. The framed version can be replaced later if sunlight, moisture, or handling damages it.
Avoid low-resolution exports
Send the original PDF to the printer whenever possible. Exporting the chart as a small image can make names and connecting lines look soft or pixelated, especially on large wall prints.
Use the chart as a family-history index
A keepsake tree works best when it points back to your research. Keep source notes, family group sheets, photographs, and document copies separately so the framed tree remains clean and readable.
Match the print size to the number of generations
One of the most common mistakes is choosing a frame or paper size before checking whether the names will remain readable. A genealogy chart with many generations usually needs a larger print area than a simple family overview.
| Chart depth | Suggested print approach | Readability caution |
|---|---|---|
| 4–5 generations | Good for A4, Letter, A3, or small framed prints | Works best when the goal is a simple family overview. |
| 6–8 generations | Better as a larger poster or wall print | Small prints may make older generations difficult to read. |
| 9–10+ generations | Best suited to large-format printing | Avoid forcing too much biographical detail into each box and do not select too small print size so that the text will not become unreadable. |
Separate display information from research notes
A framed family tree should usually show the most important facts: names, dates, places, and perhaps a short descriptor where space allows. More detailed genealogy evidence belongs in research notes, family group sheets, document folders, or source logs. Keeping those layers separate makes the keepsake more readable while still preserving the deeper research behind it.
If your main goal is direct ancestry research rather than wall display, a pedigree chart may be easier to use. If you are still choosing the correct structure, compare the main formats in the family tree types guide before finalizing the keepsake layout.
Display ideas: turning a chart into a real keepsake
Now the fun part: turning a flat print into something that feels special. Once you have the finished print framed and on the wall, your family tree stops being just data. It becomes part of your home and your story.
Idea 1: Classic framed wall piece
- Use a simple frame that fits the style of the template (plain black, white, or light wood work well).
- Add a mat board around the chart to give it breathing room.
- Hang it in a place where people gather: dining room, hallway, or near family photos.
You can also create a mini gallery wall:
- Center the large family tree
- Add smaller frames around it with:
- Old family photographs
- Copies of documents (marriage certificates, immigration papers)
- Short stories or quotes from ancestors
Idea 2: Family reunion centerpiece
Print one large poster for the reunion and:
- Place it on an easel at the entrance
- Put sticky notes or small tags nearby so relatives can add:
- Missing information
- Anecdotes ("Moved to Canada in 1951," "Loved fishing," etc.)
Later, you can update the editable PDF with the new information and reprint a "final" keepsake version.
Idea 3: Special gifts for relatives
From one filled template you can create several different keepsakes:
- The main large framed piece for yourself or for the "family home"
- Smaller framed versions for siblings, cousins, or children
- A reduced-size copy in a family history binder
Because the template is a digital file and you are allowed to print it as many times as you need for personal use, you can create a whole set of coordinated gifts.
Idea 4: Kids’ room or study corner
If you choose the colorful version of the chart, it can work well in a child’s room or study area:
- Hang the chart near a desk or reading nook
- Use it as a visual starting point for talking about where grandparents came from, what they did for work, etc.
This can make family history feel real and close rather than abstract.