Guide

How to Organize DNA Matches and Use the Leeds Method

DNA testing can give you hundreds or thousands of matches, but a long match list is not the same thing as an organized research project. This guide shows you how to turn useful matches into a working research system and how to use the Leeds Method to identify groups of relatives who may belong to the same ancestral line.

Start with four useful DNA matches and use shared matches to build four color groups.

Keep the Leeds worksheet for clustering and the tracker for matches you are actively researching.

Both worksheets are free to download and can be used with any major DNA testing service.

Free DNA research worksheets

You do not need a complicated DNA database to start. These two free worksheets are designed to work together: the Leeds Method worksheet helps you see clusters, while the DNA Match Organization Tracker keeps the details behind those clusters in one place.

Free worksheet

Leeds Method DNA Clustering Worksheet

Use four color groups to sort selected DNA matches according to shared-match relationships and identify possible grandparent lines.

Download free worksheet

Free worksheet

DNA Match Organization Tracker

Keep a running record of the matches you are actively researching, including shared cM, possible relationships, family lines, cluster colors, and contact status.

Download free tracker

Both files are intended as practical research worksheets. They do not replace the match information supplied by your testing service, and a cluster should be treated as a research clue rather than proof of a particular relationship.

Benefits of templates

Why DNA match organization matters

The difficult part of DNA genealogy is rarely getting a match. Testing services can produce large match lists very quickly. The difficult part is remembering which matches you investigated, understanding how those people relate to one another, and turning several small clues into a defensible family-history hypothesis.

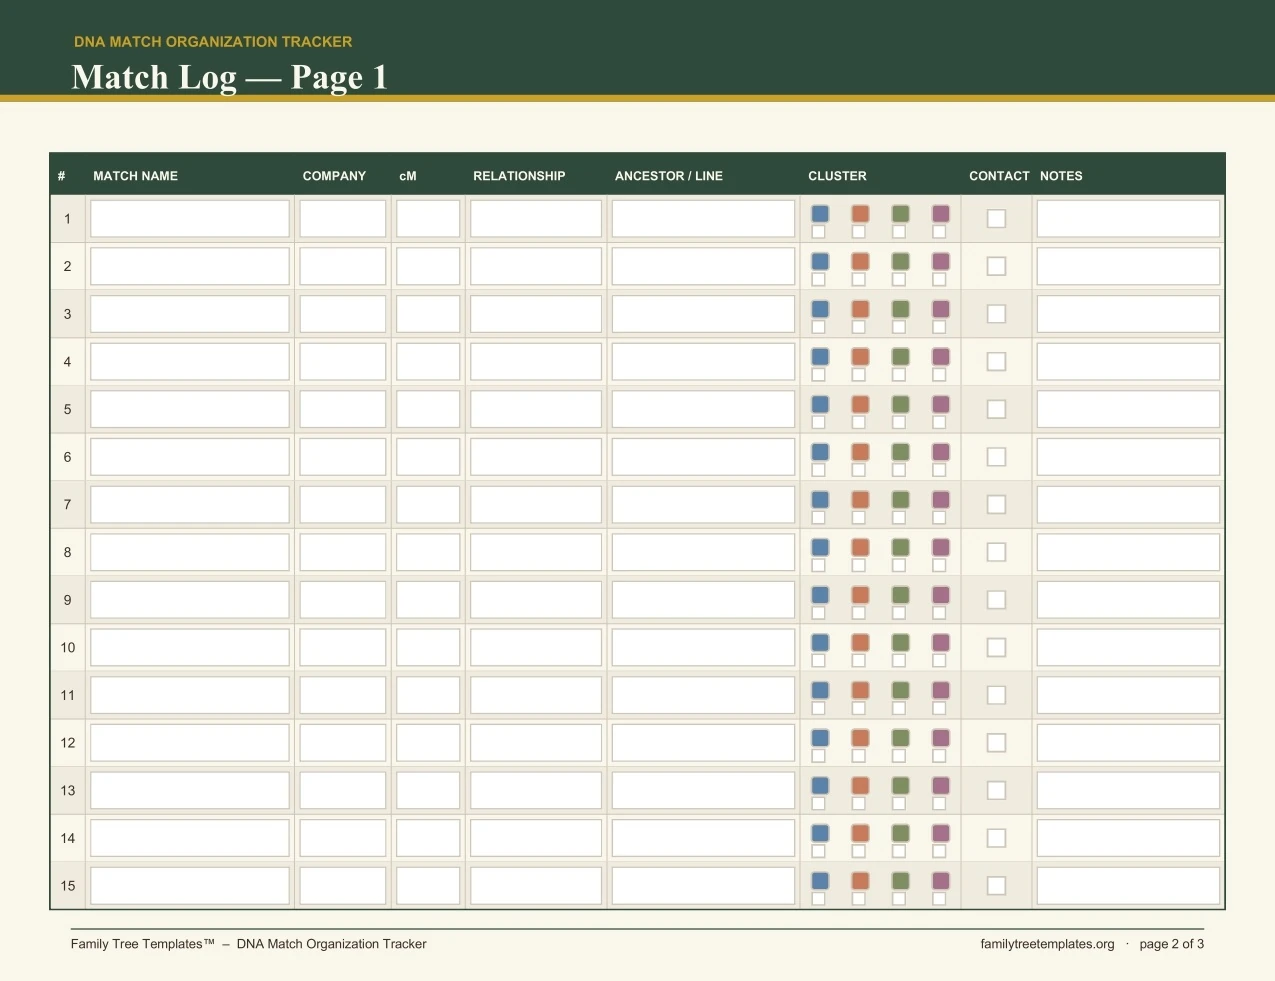
For an active research log, the useful fields are straightforward: match name, company, shared cM, predicted relationship, common ancestor or line, Leeds cluster color, contact status, and notes. You can fill these in gradually instead of trying to solve every match at once.

This is where a simple tracker becomes useful. Instead of repeatedly opening the same match and trying to remember what you discovered months earlier, you have a running research record.

If you are new to genealogy generally, it can help to establish your basic family structure first. Our Genealogy for Beginners guide covers the broader process of starting family-history research.

A simple DNA research workflow

1. Four starting matches

Choose four useful, unfamiliar matches in the roughly 90–400 cM range and use them as the starting points for the four grandparent-line grids.

2. Shared-match grids

For each starting match, copy the names from its shared-match list onto the corresponding colored grid on page 2.

3. Record overlaps

Matches appearing under two colors go into the page 3 overlap table, where you record both colors.

4. Track active research

Move matches you are actively researching into the DNA Match Organization Tracker and keep the same Leeds colors.

What to record for each DNA match

You do not need to write a biography for every match. The aim is to capture the information that will help you recognize the person later and decide what to investigate next.

Match Name

Record the name exactly as it appears on the testing site so you can find the match again.

Company

Record which DNA testing service the match appears on.

Shared cM

Enter the total shared centimorgans shown by the testing site.

Predicted Relationship

Record the relationship range suggested by the testing service.

Common Ancestor / Line

Leave this blank until you are reasonably confident. A guess written down too early can later be mistaken for a fact.

Cluster

If you used the Leeds worksheet, record the same color or colors that this match appeared under.

Contacted

Check this after reaching out so you can see who you have already contacted.

Notes

Keep any detail worth remembering the next time you open the match, such as a useful tree clue or research question.

The free DNA Match Organization Tracker adds the practical fields you need for an active research log, including the match name and notes as well as the DNA and clustering information.

DNA match clues are more useful together

Shared cM is important, but it is only one part of the research picture. A predicted relationship is not a complete genealogy conclusion. Look for several independent clues pointing in the same direction.

Shared matches

A shared-match pattern can show that several people are connected through the same ancestral branch, even when their trees do not immediately reveal the connection.

Family trees

Compare multiple trees rather than relying on a single online tree. Look for repeated ancestors, surnames, places, and family groups.

Surnames and places

Repeated surnames or geographic locations can help you name a cluster, especially when the match's tree is incomplete.

Research status

Record whether a clue is confirmed, probable, unresolved, or simply a lead. Keeping guesses separate from facts prevents assumptions from becoming permanent.

For example, a match might share 150 cM with you, have a tree containing a surname you recognize, and appear in the same shared-match group as several people connected to one known branch. None of those facts proves the relationship alone. Together, however, they give you a much stronger research lead.

Leeds Method DNA clustering: step by step

The Leeds Method uses shared-match lists to sort selected DNA matches into color groups. This worksheet follows a practical four-line workflow: start with four matches that represent the four grandparent lines, build one colored grid for each starting match, then record any matches that appear in more than one color.

The method is most useful when you are working with matches you cannot yet place. A clean result can help separate your matches into four broad family lines, but the colors are a research aid rather than proof of a particular common ancestor.

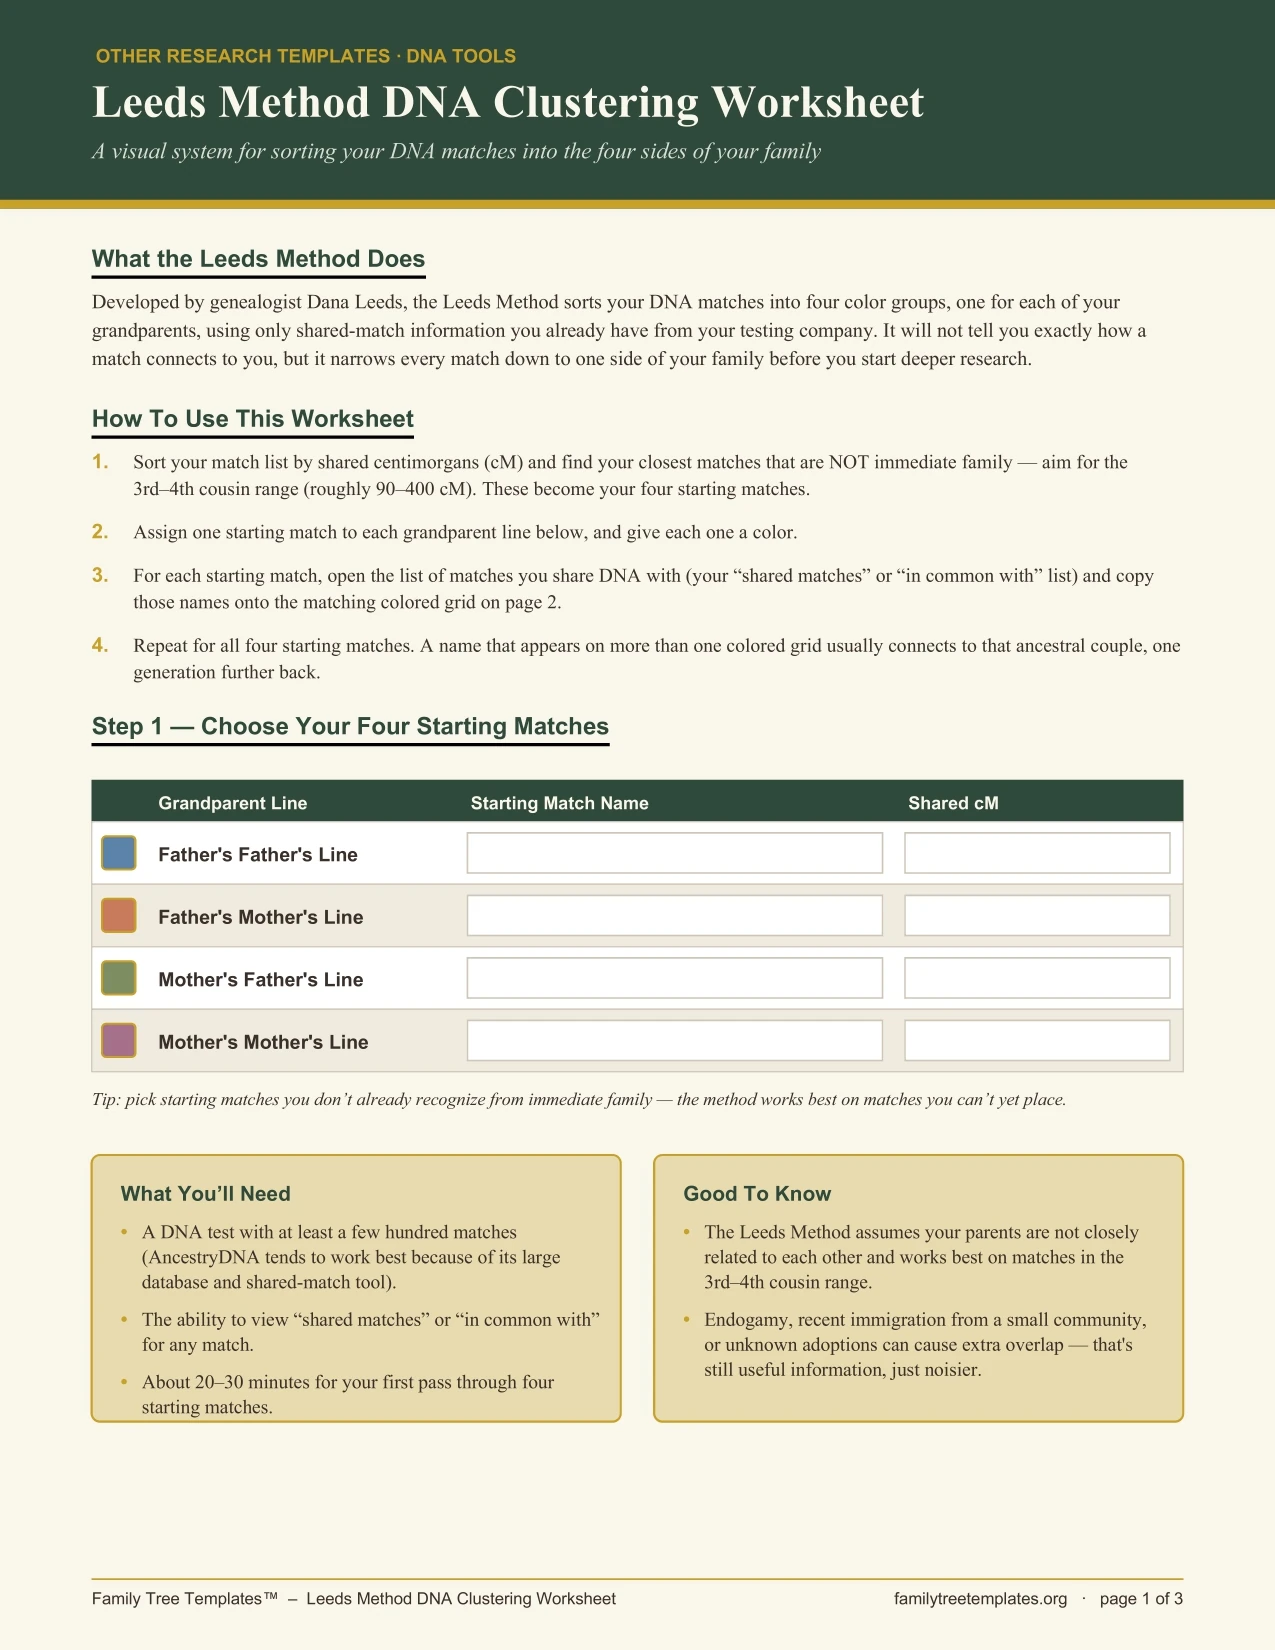
Leeds Method DNA clustering worksheet preview, page 1

Step 1: Pull your DNA match list

Open your DNA testing company's match list and sort it by shared cM from highest to lowest. The exact controls vary by company, but the goal is to work from a list where the strongest matches appear first.

Step 2: Pick four starting matches

Choose four matches to represent the four grandparent lines. Look in the 3rd–4th cousin range, roughly 90–400 shared cM, and choose people you do not already recognize as known relatives. This range is a practical starting point, not a hard cutoff.

Very close matches are poor starting points for this exercise because you already know how they connect, and their DNA may represent more than one grandparent line. The method is designed to help make sense of matches you cannot yet place.

Step 3: Fill in the page 1 table

Write each of your four starting matches into the page 1 table. Assign each match to the grandparent line you are using for that color and record the match's shared cM. These four starting matches become the reference points for the four grids on page 2.

Step 4: Open each starting match's shared-match list

Open the first starting match and find the list of people who are shared matches with both you and that person. The name and location of this feature varies by testing company:

  • AncestryDNA: open the match's profile and click Shared Matches.
  • 23andMe: open DNA Relatives, select the match, and click Relatives in Common.
  • MyHeritage: open the match and look for Shared DNA Matches.
  • FamilyTreeDNA (Family Finder): open the match and click In Common With.
  • Other companies: look for a feature called shared matches, in common with, or relatives in common.

The exact interface can change over time, but most major testing services provide some version of this shared-match relationship view.

Step 5: Copy the names onto the matching colored grid

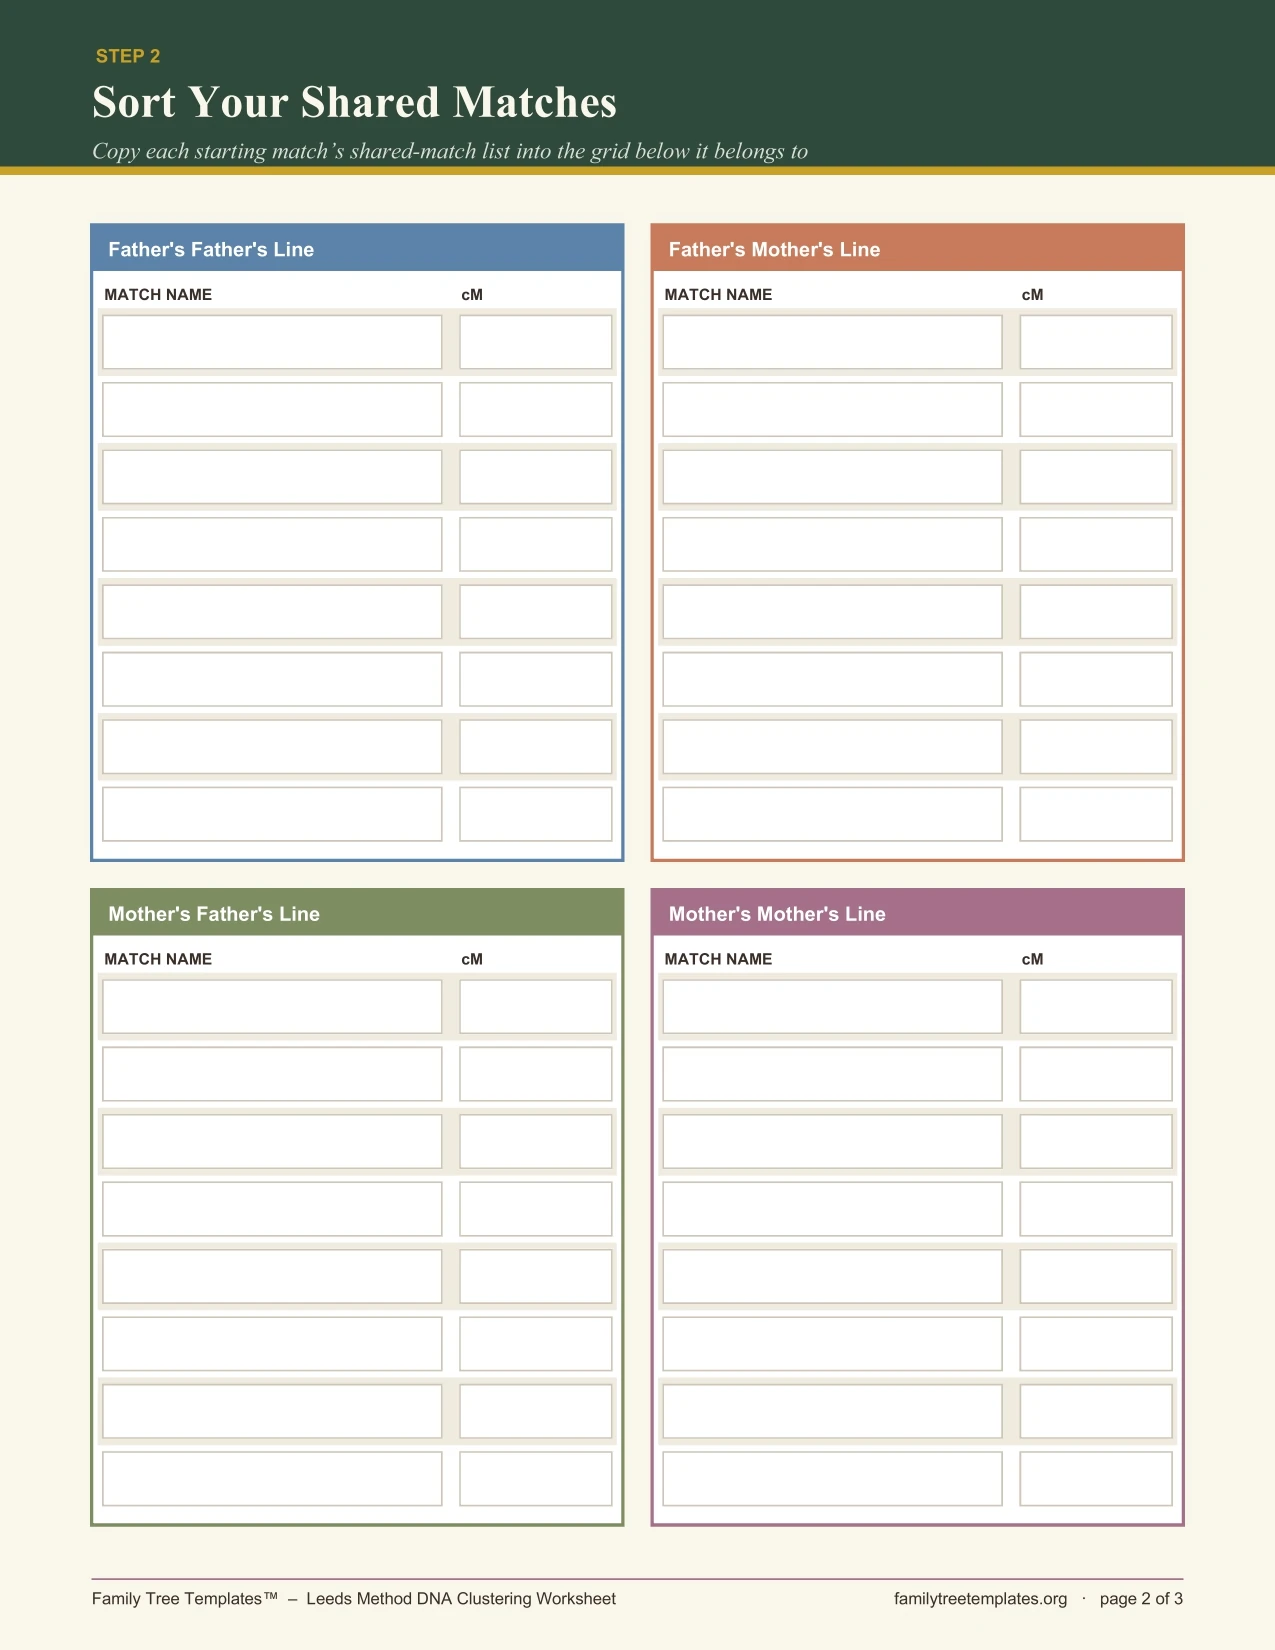
Take the names from the first starting match's shared-match list and copy them onto the matching colored grid on page 2. Do not worry if a name repeats within the same color. The purpose is to see which matches repeatedly occur together.

Leeds Method DNA clustering worksheet preview, page 2 colored grids

Step 6: Repeat for all four starting matches

Repeat the shared-match process for each of your four starting matches. Use one grid per grandparent line and keep the same color assigned to that line throughout the worksheet. By the end, the four grids should give you a visual picture of which matches are grouped with each starting match.

Step 7: Check for overlaps

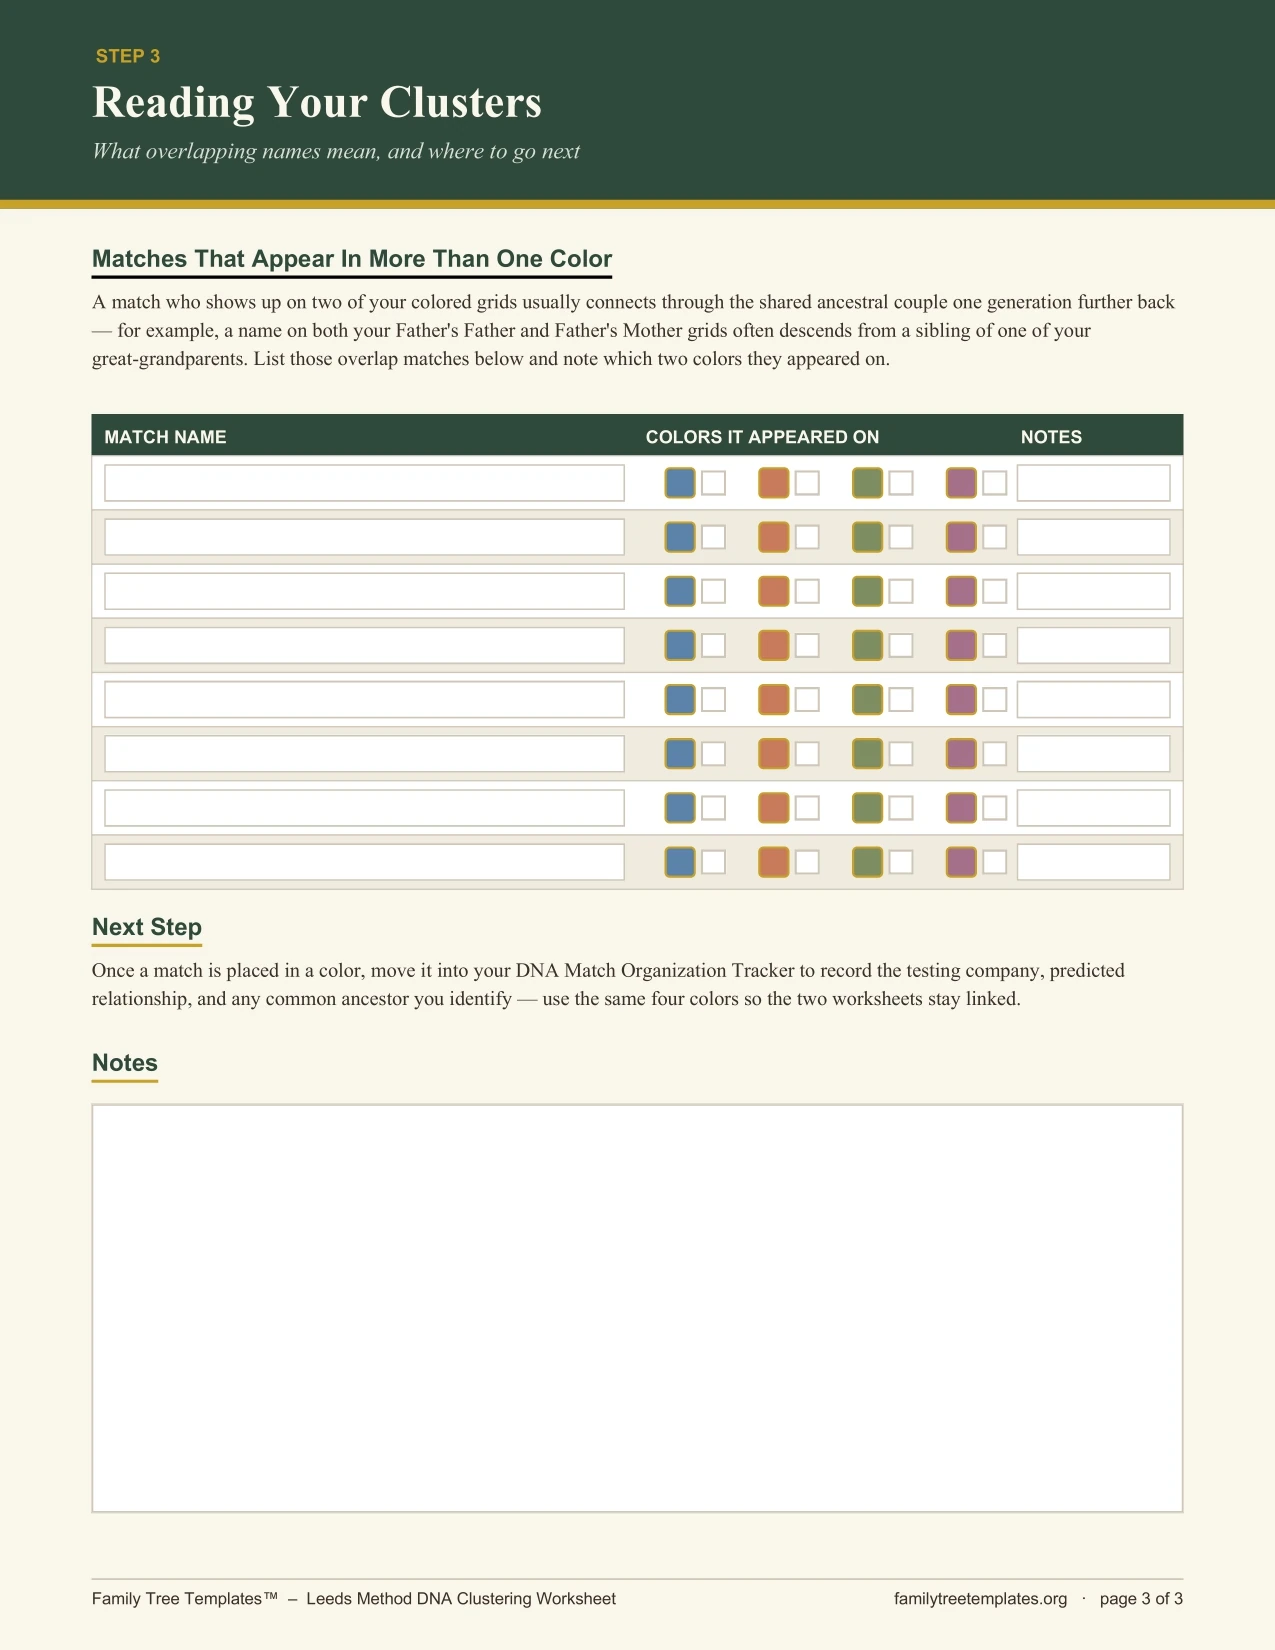
Look across the four grids for matches that appear under two different colors. Put each overlap into the table on page 3 and record which two colors it appeared under.

An overlap usually means that the match connects through the shared ancestor one generation further back than the two lines it straddles. Do not simply delete these matches: the overlap itself can be useful information about how the family lines connect.

Leeds Method DNA clustering worksheet preview, page 3 overlap table

Step 8: Move active research into the DNA Match Organization Tracker

Once you have used the Leeds worksheet to identify useful matches, move the people you are actively researching into the DNA Match Organization Tracker . Use the same four colors in the Cluster column so the tracker and Leeds worksheet remain linked.

If a match appeared under more than one Leeds color, record all relevant colors in the tracker. This preserves the connection instead of forcing the match into a single line.
When the result is not clean

Common Leeds Method problems

Starting with very close matches

Immediate family and other very close matches usually will not sort meaningfully because their connection to you is already known and may span multiple grandparent lines.

Using the 90–400 cM range as a hard rule

The roughly 90–400 cM range is a practical starting guideline for choosing useful starting matches. It is not a requirement that every match in the project fall inside it.

Including very low cM matches too early

Matches under about 20 cM can sometimes be identical-by-chance rather than a genealogically meaningful shared ancestor. Treat them cautiously rather than letting them drive the main clustering pattern.

Treating every overlap as an error

A match appearing on two colored grids is worth recording. The overlap can indicate that the match connects through the shared ancestor one generation further back than the two lines it straddles.

Ignoring endogamy

If many matches appear in three or four colors at once, the pattern may point to endogamy or a small, intermarried community. The information remains useful, but the clusters become noisier to interpret.

Writing guesses as if they were facts

Leave Common Ancestor / Line blank until you are reasonably confident. Record hypotheses separately from established relationships so an early guess does not become a false certainty.

What to do when a match has more than one color

Multiple colors can be one of the most interesting parts of a Leeds Method worksheet. Do not automatically remove a match simply because it appears in more than one group.

In this worksheet, an overlap is specifically a match that landed on two different colored grids. Record the match on page 3 and note which two colors it appeared under. An overlap usually means that the match connects through the shared ancestor one generation further back than the two lines it straddles.

If a lot of your matches land in three or four colors at once, that usually points to endogamy or a small, intermarried community somewhere in your tree. It is still useful information, but the clustering pattern will be noisier to read.

DNA Match Organization Tracker: how to use it

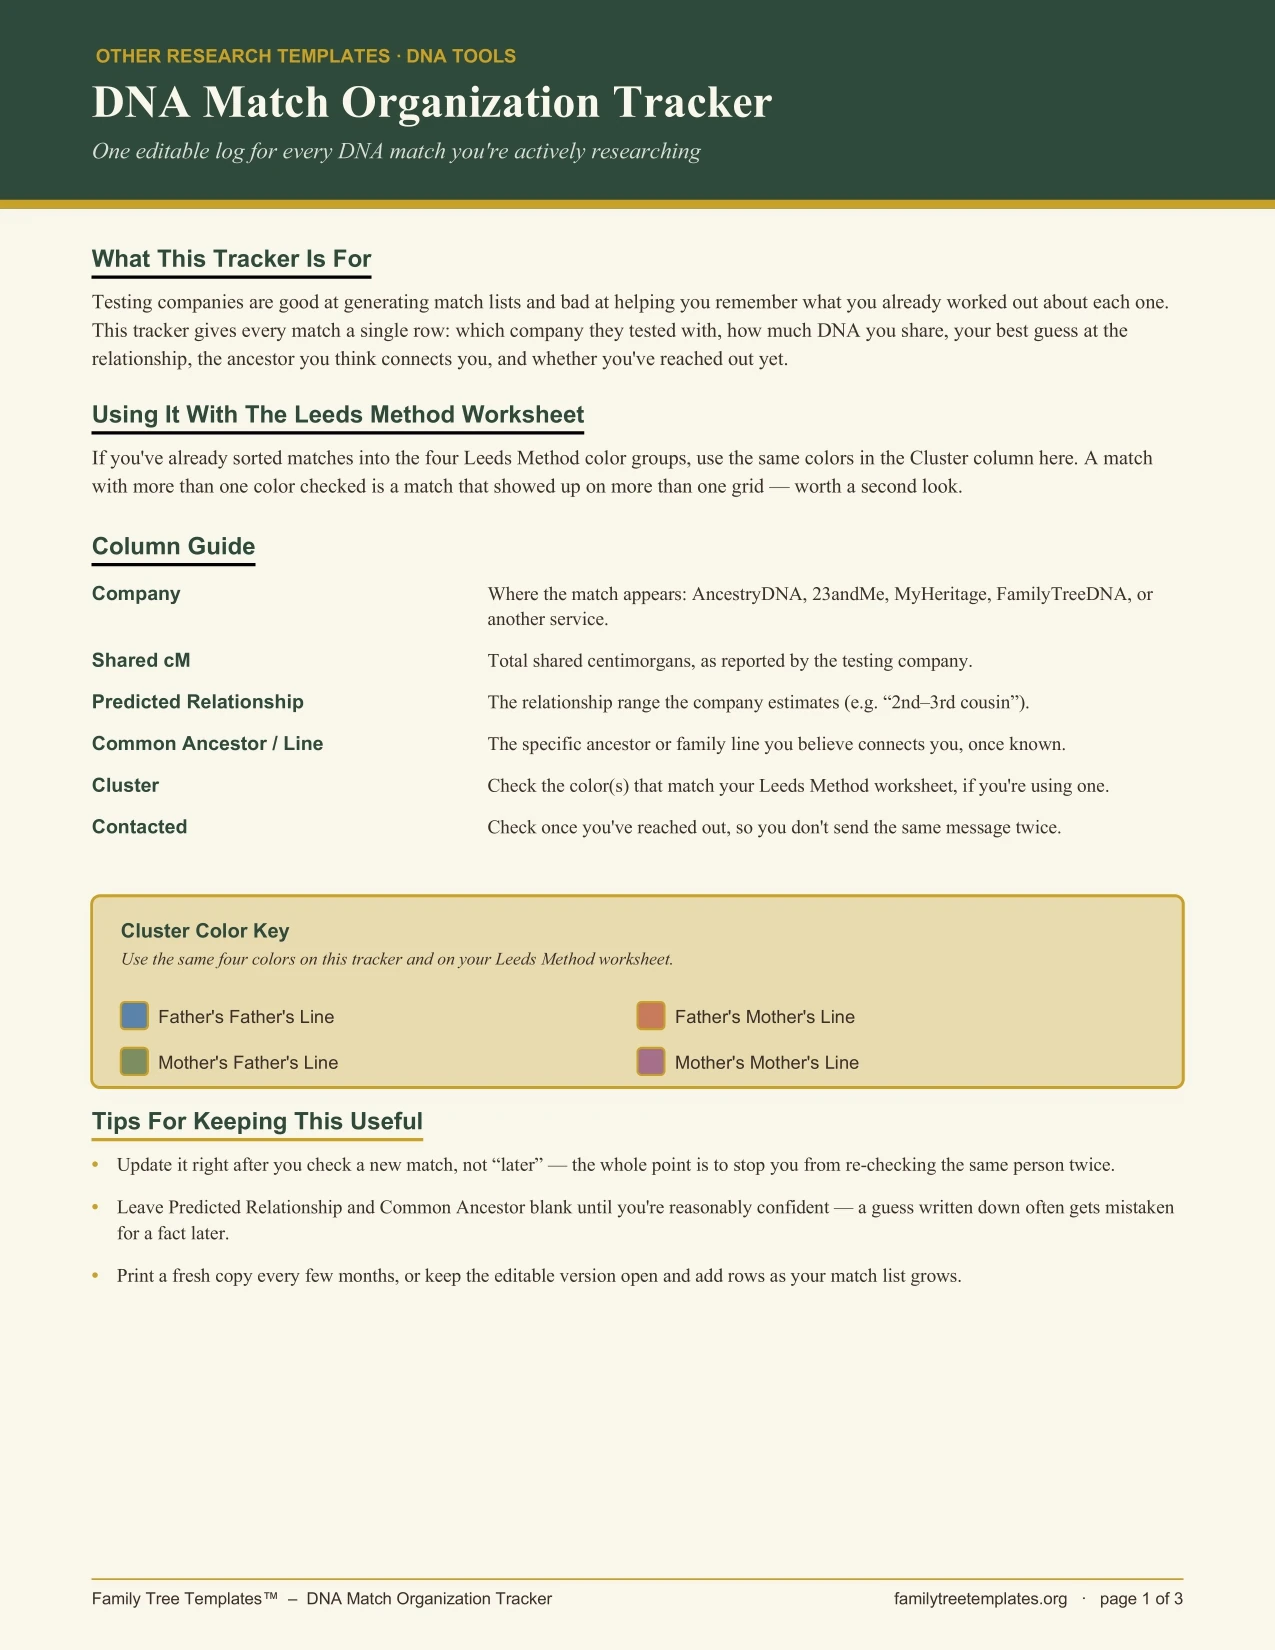
The tracker is for matches you are actively working on, not for copying your entire DNA match list. Its purpose is to give each useful match one place where you can record what you know, what you are trying to determine, and what you have already done.

Step 1: Open or print the tracker

Open the file in a PDF reader that supports form filling, such as Adobe Acrobat Reader, Preview on Mac, or most current web browsers. You can also print the tracker and fill it in by hand.

Step 2: Add one row per match you are actively working on

Do not try to enter your entire match list. Start with matches you have already learned something about or people you are actively trying to place. This keeps the tracker useful as a working research log rather than turning it into another copy of your testing site's match database.

Step 3: Fill in information as you learn it

You do not need to complete every column when you first add a match. Fill in the fields as your research develops:

Match Name

Record the name exactly as it appears on the testing site so you can find the match again.

Company

Record which DNA testing service the match appears on.

Shared cM

Enter the total shared centimorgans shown by the testing site.

Predicted Relationship

Record the relationship range suggested by the testing service.

Common Ancestor / Line

Leave this blank until you are reasonably confident. A guess written down too early can later be mistaken for a fact.

Cluster

If you used the Leeds worksheet, record the same color or colors that this match appeared under.

Contacted

Check this after reaching out so you can see who you have already contacted.

Notes

Keep any detail worth remembering the next time you open the match, such as a useful tree clue or research question.

Step 4: Use the same Leeds colors

If you have completed the Leeds Method worksheet, use the same four colors in the tracker. If a match appeared under more than one color, record more than one color. This keeps the detailed tracker connected to the visual clustering work.

Step 5: Use all 30 rows before making a new copy

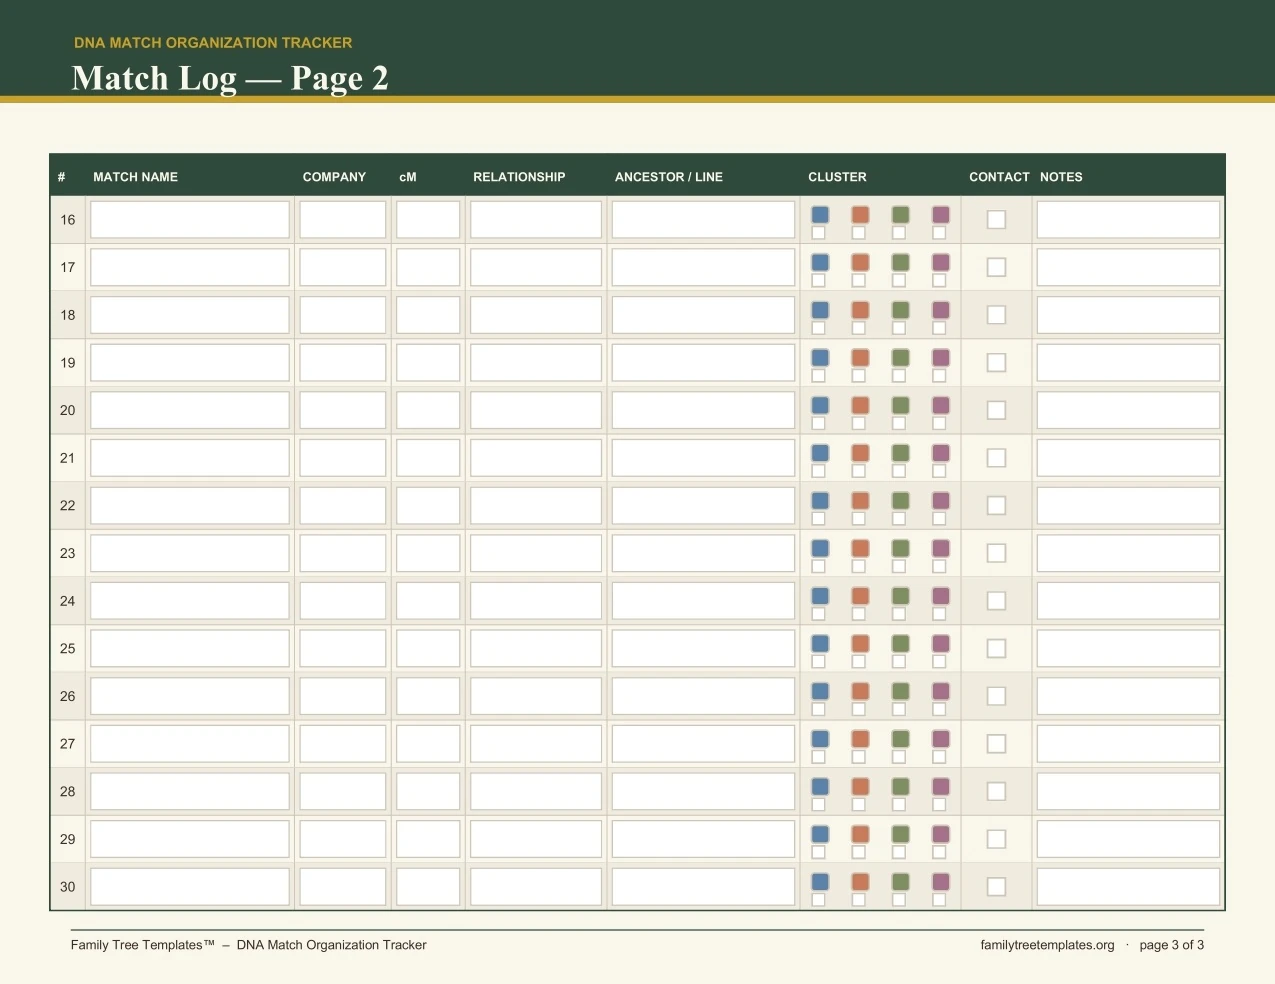
Each table page holds 15 rows, and the file includes two table pages, giving you 30 rows total. If you need more, duplicate a table page in your PDF editor or print extra copies of that page.

Step 6: Come back to it regularly

The main purpose of the tracker is to stop you from re-checking a match you already worked out. Update it when you learn something useful, contact someone, or change your working hypothesis.

This works especially well alongside other genealogy research templates when your DNA work becomes part of a larger family-history project.

Preview the free DNA Match Organization Tracker

The tracker is designed as a practical log rather than a replacement for your DNA testing service. Its purpose is to preserve what you have learned about matches you are actively researching and to make it clear what you have already done.

DNA Match Organization Tracker preview, page 1
DNA Match Organization Tracker preview, page 2
DNA Match Organization Tracker preview, page 3

Keep DNA research separate from your finished family tree

DNA match research is an evidence-gathering process. Your finished family tree is usually a cleaner summary of relationships you are prepared to document. Keeping these two layers separate makes both more useful.

Use the DNA tracker for hypotheses, unresolved matches, possible common ancestors, and contact notes. Once a relationship is sufficiently supported, you can incorporate it into your broader genealogy records and family tree.

If you are ready to map a confirmed direct line visually, a pedigree chart can provide a cleaner ancestry-focused summary. For broader family relationships, see the main family tree templates category.

Newsletter

Get one editable Family Tree Template at no cost

Subscribe to the newsletter and get one editable Family Tree Template by email at no cost.

Etsy shop

Looking for more genealogy templates?

Browse the Etsy shop for editable family tree charts and other printable genealogy templates.

Frequently asked questions

What is the Leeds Method?

The Leeds Method is a DNA match clustering technique that uses shared matches and color groups to help separate DNA matches into family lines. When the results are clear, four groups often correspond to the four grandparent lines.

What cM range should I use for the Leeds Method?

A practical starting range is roughly 90–400 shared cM, especially when choosing four starting matches you do not already recognize. It is a guideline rather than a strict cutoff.

Why should I avoid very close DNA matches?

Immediate family and other very close matches usually do not sort meaningfully because you already know how they connect, and they can belong to more than one grandparent line. The Leeds Method is more useful with matches you cannot yet place.

What does it mean if a DNA match appears in two colors?

Record the overlap rather than treating it as an error. A match appearing on two colored grids can indicate a connection through the shared ancestor one generation further back than the two lines it straddles.

What if many matches appear in three or four colors?

If many matches repeatedly appear in several colors, the pattern can point to endogamy or a small, intermarried community somewhere in your family tree. The information can still be useful, but the clusters are noisier to interpret.

Why should matches under about 20 cM be treated cautiously?

Matches under about 20 cM can sometimes be identical-by-chance rather than evidence of a genealogically relevant shared ancestor. They can still be recorded, but they should be interpreted cautiously.

Does a Leeds Method cluster prove a common ancestor?

No. A cluster is a research clue. Use family trees, surnames, places, records, known relatives, and other evidence before treating a proposed common ancestor or relationship as established.

Do I need to use a specific DNA testing company?

No. The guide is platform-neutral. The exact location of shared-match information varies, but major testing services generally provide a feature called shared matches, in common with, or relatives in common.

How many rows does the DNA Match Organization Tracker hold?

The tracker has 15 rows on each of its two table pages, for 30 rows total. If you need more space, duplicate a table page in a PDF editor or print extra copies of that page.